Introduction
This tutorial will help you to install and set up a few email accounts, by using the built-in POP3 Service in Windows Server 2003. I will assume you have basic knowledge about the Windows Server family and Mail Servers, but I have tried to make this tutorial as easily comprehensible as possible. The tutorial has been tested on Windows Server 2003 Enterprise Edition but should also work on Windows Server 2003 Standard Edition. I will not cover MX records and other similar things in this release.
To follow this tutorial you need a stand alone server. You can of course use a Domain Controller, but that assumes you understand when to not follow the tutorial and use other settings (i.e. authentication method).
Install the Email Server
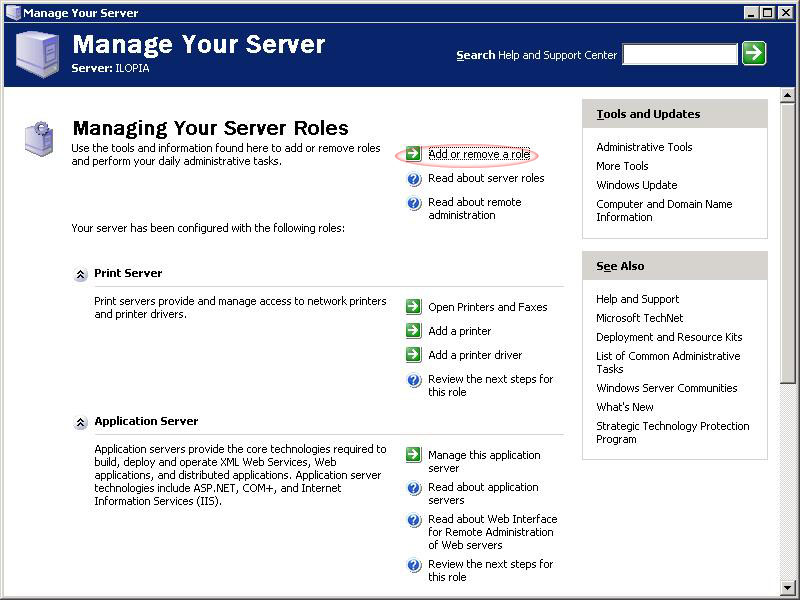
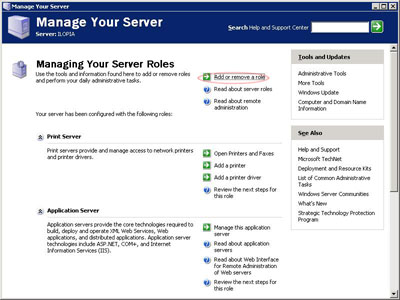
You can install the Email Server by using Add or Remove Windows Components or Manage Your Server. In this tutorial we will use the latter, because it's the quickest way to get this up and running. Manage Your Server is a bit easier to use too, because it will prompt you for the domain you want to use during setup. That will not Add or Remove Windows Components do, and we have to do everything manually.
If it's not open, start Manage Your Server by clicking Start->Programs->Administrative Tools->Manage Your Server.
- Click on Add or remove a role.
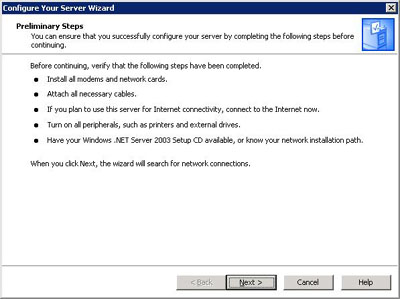
This will start the Configure Your Server Wizard. Read the text and make sure you have connected all the necessary cables and all the other things it says you should do before continuing.
The wizard will now detect your network settings. This will take a while depending on how many network connections you have
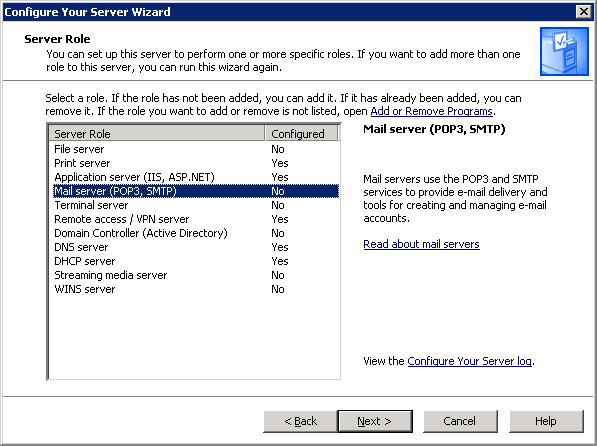
We now come to the step where we add and remove roles for our server. We will add the Mail Server role. I also suggest that before you click Next, click Read about mail servers because this tutorial is not a complete reference.

- Click Mail server (POP3, SMTP)
- Click Next
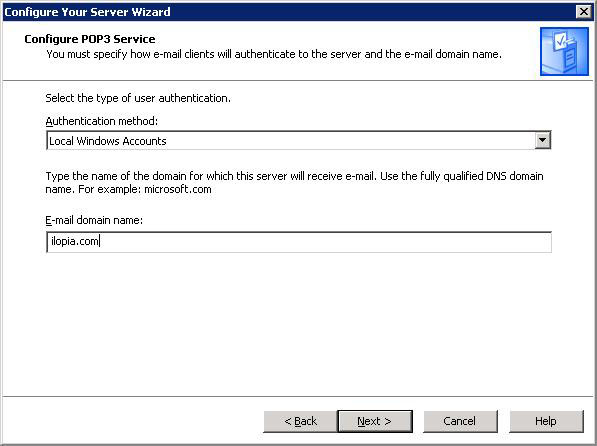
You will now specify the type of authentication and type the email domain name. In this tutorial we will use Windows Authentication, and I will use my domain name, ilopia.com. You should of course use your domain name.

Next step is to confirm the options you have selected.
The installation will start, and will also start the Windows Components Wizard. When you get prompted to insert your Windows Server 2003 CD-ROM into your CD-ROM drive, do so. If you didn't get prompted to do that, you maybe already have it in the drive. Hopefully within some minutes you get this screen:

You can now see the log, click view the next steps for this role, or click Finish. Do whatever you feel you want to do before continuing.
You have now successfully installed the mail server, congratulations!
Configure the Email Server
So, it is no fun with a mail server installed, if we can't use it. And to use it, we have to configure it. This section will help you configure the mail server.
- Click Start, then run, and type p3server.msc
This will open up the POP3 Service. This is where you configure and manage the POP3 part of the mail server.
- Click on <ComputerName> in the left pane
- Click on Server Properties in the right pane
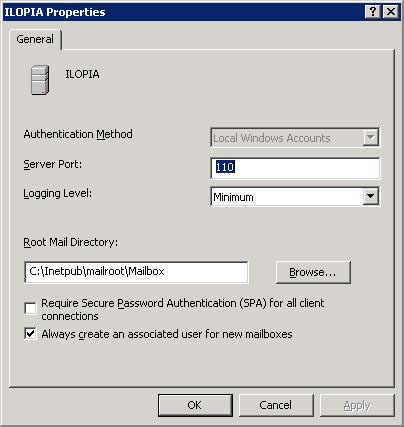
This brings up the Properties for our Mail Server.
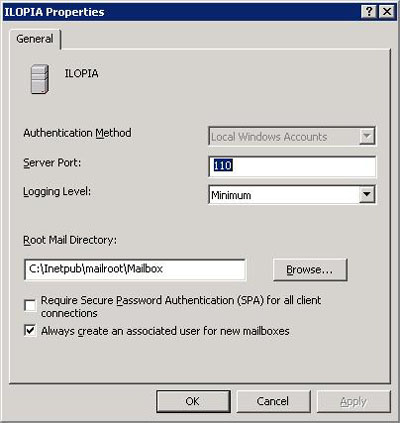
As you can see, we have a lot of settings. We will use the standard setup in this tutorial, but I will explain every setting we can change in case you want to change something in the future.
Authentication Method
There are three different authentication methods you can use; Local Windows Accounts, Active Directory Integrated and Encrypted Password File. It is an important decision which method to use, because once you have chosen, you must delete all email domains on the server to change method (from now on, you can migrate Encrypted File user accounts to AD, but nothing else can be migrated).
- Local Windows Accounts
If your server is stand alone (not member of an Active Directory domain), and you want to have the user accounts on the same local computer as the POP3 service, this is the best option. By using this option, you will use the SAM (Security Accounts Manager) for both the email user accounts, and the user accounts on the local computer. This means that a user can use the same user name and password to be authenticated for both the POP3 service and Windows on the local computer. But there is a limitation, although you can host multiple domains on the server, there must be unique user names for all domains. So, let us say you have two users named Sandra. One working at company1.com and another one working at company2.com. Their user name used will be sandra@company1.com and sandra@company2.com. But in SAM, they will both have the same user name, sandra, so one of them must be renamed to something else (if we don't want them to read each other's emails).
If you create the user account when you create the mail box (by using the POP3 interface), the user will be added to the POP3 user group. Members of this group are not allowed to logon locally. The fact that the users are added to the POP3 group does not mean that you must be a member of this group to have a mailbox. You should however be careful adding mailboxes to users that are not member of the POP3 group, because the password used for email can for example be sniffed (if you are not using SPA), or someone can brute force the password and gain access to the server.
- Active Directory Integrated
You can select this option if the server is a member of an Active Directory domain or is a Domain Controller. By using this you will integrate the POP3 Service with you AD domain. AD users can use their user name and password to send and receive email. Of course you have to create mailboxes to them first. UnlikeLocal Windows Accounts you can use the same user name on different domains. So sandra@company1.com and sandra@company2.com will have different mailboxes. There is however one thing you should know about, that does not affect the mailbox name and email-name, and the pre-Windows 2000 user name can be changed. Active Directory do not support the same pre-Windows 2000 user name, and this name is usually the same as the user name, which means that if you create a mailbox and user with the same pre-Windows 2000 user name, it will rename the pre-Windows 2000 user name.
- Encrypted Password File
This is the option you want to select if you don't use Active Directory or don't want to create users on the local computer. Like Active Directory Integratedyou can have the same user name on different domains, but you cannot assign the same user name to several mailboxes within the same domain.
This method works by creating an encrypted file stored in each user's mailbox. This file contains the password for the user. When the user wants to check his/her email, the password that the user supplies is encrypted and compared to the one in the file.
It is possible to migrate Encrypted File user accounts to AD user accounts.
Server Port
I strongly recommend that you use port 110 because this is the standard port for the POP3 protocol. If you change this, make sure you notify all users so they can configure their email clients to use this other port. Also make sure you restart the POP3 service if you change this.
Logging Level
Four options to choose between. If you change this, remember that you must restart the POP3 service.
- None
Nothing is logged.
- Low
Only critical events are logged.
- Medium
Both critical and warning events are logged.
- High
Critical, warning and informational events are logged.
Root Mail Directory
If you don't want to use the default Mail Directory, you can choose another one. Make sure the path is not more than 260 characters and you can also not store to the root of a partition (i.e. C:). It is strongly recommended that you use a NTFS formatted partition. You can't use a mapped drive, but the UNC name (\\servername\share) can be used. If you later change the store, and there are still emails in one or more boxes, you must manually move the folders in which there are emails to the new location. You must also reset the permissions on the directory by using winpop set mailroot.
SPA
Enable SPA if you want to have a secure communication between your email sever and email clients. This will send both the user name and password encrypted from the client to the server, instead of sending it in clear text. SPA supports only Local Windows Accounts and Active Directory Integrated Authentication. It is recommended to use this. Remember to restart the POP3 service if you change this.
Create a mailbox
The Setup Wizard created a domain to us, so we do not need to create this manually. If you did not use Manage Your Server to install, add the domain manually be clicking the server name in the left pane and then click New domain in the right pane. Remember to set the properties before you add the domain.
- Click on your domain (ilopia.com in my case) in the left pane.
- Click Add Mailbox in the right pane.
This will open up the Add Mailbox window.
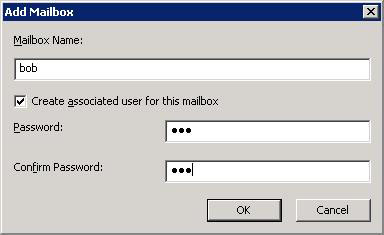
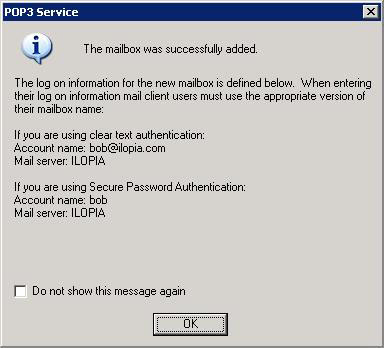
- Write bob in Mailbox Name
- Write bob as password (of course this is not a password you should use in a production environment, it's too short)
- Click OK
A message will pop-up and tell you how to configure the email clients. Read this, and notice the difference when using SPA or not.

What we just did was not only creating a mailbox named bob, but we also created a user bob. We will also create a mailbox for an existing user - ariel. To do that we simply perform the same steps, but we uncheck Create associated user for this mailbox. Remember that the mailbox name must be less then 21 characters (64 for Encrypted Password File and Active Directory). Periods are allowed to use, but not as the first or last character.
So, we have now two users. Are they equally? No, bob is a member of the POP3 Users group, which is denied to logon locally. Ariel is not member of this group, and can still logon locally and access her mailbox.
Configure the SMTP Server
Actually, that's it! It is this simple to configure the POP3 part. But it is not yet working as we want, we have to configure the SMTP part to be able to receive and send emails. Yes, I said receive emails. A common mistake is to think that the POP3 server receives the emails. But that is not true, all the POP3 is doing is 'pop' the emails out to the clients. It's the SMTP server that is communicating with other SMTP servers and receives and sends emails.
- Open Computer Management
- Expand Services and Applications, expand Internet Information Service
- Right click Default SMTP Virtual Server and click Properties
- Click the Access tab
- Click the Authentication button and make sure Anonymous Access and Integrated Windows Authentication is enabled.
- Click the Relay button and make sure Allow all computers which successfully... is enabled and Only the list below is selected.
First of all, Authentication and Relay is not the same thing. We use the Authentication button to specify which authentications methods are allowed for users and other SMTP servers. So enabling Anonymous here is not a security issue, in fact, it's required if we want our server to be able to receive emails from other servers on Internet (I doubt you want to tell all administrators of email servers on Internet how they should logon to yours). We also need Windows Authentication so the email clients can authenticate to the server and be able to relay (send emails).
As Relay Restrictions we selected Only the list below because we do not want to be used by spammers to send emails. But we never specified any computers. That is valid, because we wants our clients to always use the username and password to authenticate, no matter where they are.
If you want users to only be allowed to relay if they are on a private network, then you can uncheck Windows Authentication as allowed authentication method, and specify the IP range for your network in the Relay Restrictions window.
Is that all? Do we have a working email server now? Well, the answer is yes. But we still haven't configured the email clients.
Configure the email client
We will use Outlook Express as email client.
- Start Outlook Express (any computer that is connected to the email server)
- Click Tools and then Accounts
- Click the Add button and select Mail
A wizard starts. Use the following table to complete the wizard:
| Display name | Bob |
| E-mail address | bob@<your domain> (bob@ilopia.com) |
| Incoming mail server is a | POP3 |
| Incoming mail server | <your domain> (ilopia.com) |
| Outgoing mail server | <your domain> (ilopia.com) |
| Account name | bob@<your domain> (bob@ilopia.com) |
| Password | bob |
| Remember Password | Checked |
| SPA | Unchecked |
Are we finished now? Well, let us try to send an email. Didn't work, did it? I'm sure you got an error message similar to this one:
The message could not be sent because one of the recipients was rejected by the server. The rejected e-mail address was 'webmaster@ilopia.com'. Subject 'Test', Account: 'ilopia.com', Server: 'ilopia.com', Protocol: SMTP, Server Response: '550 5.7.1 Unable to relay for webmaster@ilopia.com', Port: 25, Secure(SSL): No, Server Error: 550, Error Number: 0x800CCC79
The reason why we got this is written in the error message. 'Unable to relay for <email address>'. This means that we didn't get authenticated to the SMTP server. So, let us take a look at the email client's settings again.
- Click Tools, then Accounts.
This will bring up this window:

- Click the correct account and then the Properties button
- Click the Servers tab
- In the Outgoing Mail Server section enable My server requires authentication.
- Click Apply, click OK, click Close
- Create a new email, and send it
And hopefully you will receive an email within some minutes (if you sent it to your own email account).
Enable SPA
Of course we want our network as secure as possible, so we prefer to use SPA (Secure Password Authentication). This will, as stated before, send the user name and password from the client encrypted, instead of clear text.
- Click Start, then Run
- Type p3server.msc
- In the right pane, right click your computer's name and click Properties
- Check the box Require Secure Password Authentication...
- Click OK
- You will be prompted to restart the Microsoft POP3 Service, click Yes
We must also change some settings for the email clients.
- Start Outlook Express
- Click Tools, click Accounts
- Click the Mail tab, click the name of your email account, click Properties
- Click the Servers tab, and click Log on using Secure Password Authentication
- Change the account name from bob@<your domain> to bob
- Click Apply, click OK
More help
If you need more help, or are curious about things, take a look at the help files in Windows Server 2003. They are excellent and you will find out that there are more features that I have not talked about.
Links
FAQ
Q. I have configured the email server and I can send emails without problems. But all emails the server receives ends up in the Drop folder and are not moved to the proper mailbox. What is wrong?
This can happen if you have moved the mail root recently and forgot to cycle the server. To cycle it, open the Services snap-in and find Simple Mail Transfer Protocol (SMTP) in the list. This problem can also occur if you created the SMTP account manually through the IIS snap in. What you have to do in this case is to delete the domain from SMTP and then re-add it using the POP3 tools.
Q. Does the built-in email server support Internet Access Message Protocol (IMAP)?
No, the built-in email server does not support IMAP. If you want or need IMAP support you'll have to look at Exchange 2003, Exchange 2000 running on a Windows 2000 Server machine in a Windows Server 2003 domain, or use a third party email server.
Q. I want the users to be able to read and write email from Internet. Does the built-in email server offer a web interface?
No, the built-in email server is very limited and is only a basic email server. So this feature is not included in it.
Q. I cannot find the SMTP Snap-In in IIS Manager. How do I get it back?
This is a known issue, and should be fixed in Service Pack 1 for Windows Server 2003. To fix it, follow these steps:
- Click Start, then Run and type cmd and press ENTER.
- Type regsvr32 %systemroot%\system32\inetsrv\smtpsnap.dll
Uninstall and re-install the SMTP Service will not fix this.
Q. Where are the POP3 logfiles?
The POP3 Service logs to the Event Logs, which can be viewed by using Event Viewer.
Cheers & thanks,
Anzil Ali Liyakkath
anzilali.webhostrepo@gmail.com